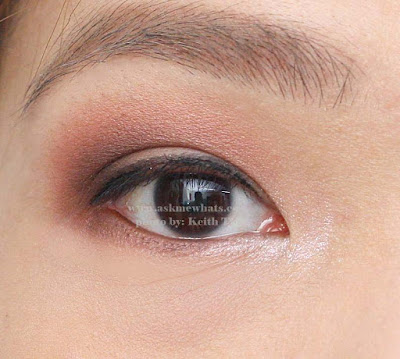
Hi loves! Today, I am finally sharing a tutorial on how I would do a typical "hooded eye make up" look for my clients. When I say typical, I do not use the exact shades all the time but I do use the same technique to create bigger looking eyes without looking fake!
One of the easiest way to create "fake crease" for hooded eyes is to do the "cutting of the crease" technique (Let me know if you want me to do a separate tutorial on this.) The "cutting of the crease" technique is PERFECT if you are just going for "photography make up" (ex. Prenup, graduation photos, etc...). If you have hooded eyes and you are attending a very important event like Weddings, Birthday Parties, etc... wherein people will see your make up up-close PLUS you may obviously need to blink in front of them, I highly recommend to do a "dome-shaped" eye make up instead.
Am I confusing you? Well, I hope not! So as to clearly state what I want to tell you, I have created another "photo-torial" for you to understand!
A simple Day time look with left side of the face with dome-shaped eye makeup and bare eyes on the right.
Some tips before we start ---
- If you have hooded eyes, try to use matte textured eyeshadows. Matte eyeshadows can absorb light thus "flatten" the look of your hooded lids.
- Try to stay away from shimmery eyeshadows as much as possible.
- Experiment on different shades combination! Be adventurous! You don't need to just stick on neutral shades.
- Invest on good, quality eyeshadow brushes that aren't scratchy.(Ex. MAC, Charm Essentials, Sigma or Real Tecniques)
- Eyeshadow application should be done with your eyes OPEN! (now that surprised you?)
Instead of sticking eyeshadow application on the "mobile lid", apply eyeshadow bringing it up and open your eyes making sure you see the shadows peeking. If you open your eyes and you still don't see any color, that means, you have to re-apply bringing eyeshadow application higher.
Best applied with patting motion from inner corner to outer corner. Create dome-shape (ex. Half Moon) As soon as you are satisfied with the shape, work with a clean brush and blend out the edges.
Then pick a darker shadow shade, you may prefer to apply this shade on the lower lashline blending it upwards to create a nice "smoked out effect".
Since my eyes isn't really droopy, I prefer to create "deeper crease" look by applying the darker shade eyeshadow on the outer-v of the lids. Now keep in mind not to lift your eyelid during application as once you open your eyes normally, the dark colored shadow may disappear.
How to do it the right way? Look straight (not lifting your eyelid) and apply the darker shadow shade a little bit above the outer-v.
Pick your clean blending brush again and gently blend in. Keep in mind the keep the strokes small so it won't look messy!
Using what's remaining of the pencil brush, apply the shadow on the outer corner of your lower lid. This will help create "balance" and your eyes will look bigger.
OPTIONAL:
If shimmer shadows make you happy and you really must have at least 1 shimmer shadow during makeup application, I highly recommend just to apply some on the inner corner of the eyes.
Now on to your liner, as stated on my previous tutorial, pick a super waterproof liner as droopy eyes tend to have more smudging than users with regularly shaped eyes! I prefer to use waterproof mascara and apply using an eyeliner brush. Stay very close to the lashline as possible and for this, I won't be doing any "winged liner look".

Now on to under the arch of brow bone, clean up mess by using the same clean brush and apply a bit of your face powder or powder foundation shade! Again, if you have droopy eyes, try not to pick shimmery shadows as it will make your eyes look more puffy!
You may also apply some of the mascara (as liner) on the lower lash line. Curl your lashes and apply coats of mascara! If you have droopy eyes, it is best to use falsies because they will open your eyes like no other! But I'm sticking to very simple makeup tips for everyday!
Here you go! Dome-shaped eye shadow make up for droopy eyelids!

Application of eyeshadow shouldn't be exactly the same on both eyes! Since my right eye (facing you) is more "droopy", I adjusted the application to make both eyes appear more even!
Comprende?
Let me know if you want more eye make up tutorial for this eye shape!
If you have other suggestions and requests, feel free to comment below because you know I read every single comment!
Keep smilin'
Stay happy!


Thanks for the tip ms.nikki☺ im more into brown eyeshadow since it was the basic. Hehe. I find it hard for me to apply eyeshadow, it always end up not pantay. 😁
ReplyDeletepractice lang sis! pero on normal days, I'm just a liner girl too! so gets kita!
Deletewow.. i will do this (and try to my sibs) for they have this type of eyelids.. practice makes perfect di po ba ms nikki =)
ReplyDeletetama! :D
DeleteHope you'll have video tutorials soon.. ang ganda po.. I find it hard lalo na po sa eyeshadow that's why I don't really use a lot. The brushes you used po are also good..have to find cheaper ones..hehehe..
ReplyDeleteYup, I hope I can be able to do it as well! and sana well received ng readers, thanks for the request :D
Delete