Showing posts with label Thevi. Show all posts

Saturday, October 22, 2022

My Favorite Face Brushes


I have been reviewing a lot of brushes for the past years.  From high end brands to the most inexpensive ones, it is funny how I never shared my top picks!  I mean not everyone can invest on a set of brushes so today, I am sharing my top 4+1 brushes that I can't live without.

My Favorite Face Brushes.  Top face brushes

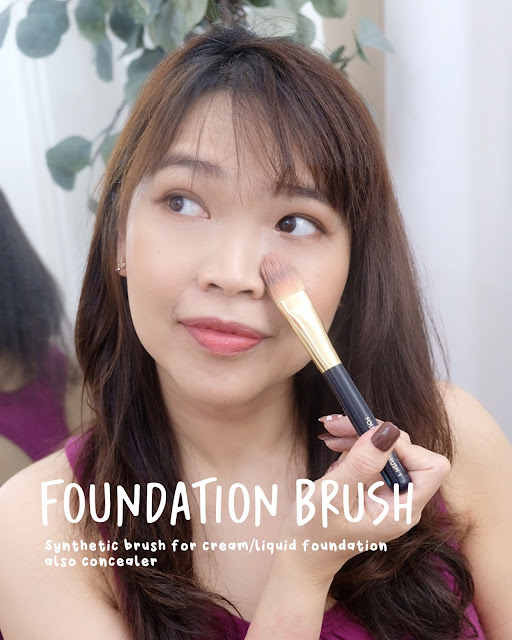
1. Foundation Brush

I never use this type of brush to "blend" my base, instead, I use this to apply the right amount of product seamlessly to my skin.  This is a nice brush to also apply concealer.  The flat side of the brush gives ample "coverage" so I don't need to use a lot of product because the brush does not absorb as much product as sponges.

My Favorite Face Brushes.  Top face brushes
Foundation brush brand: Estee Lauder

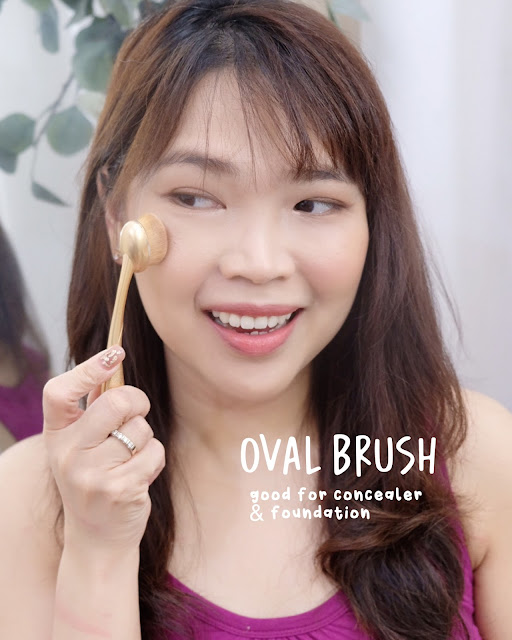
2. Oval Brush

The Oval Brush came out in the latter part of the Beauty Game.  Though I do not talk much about these type of brushes, I pick them up a lot. (if you zoom closer, you can see how worn out the this brush is!) 

How do I use this brush?  I apply a good amount of concealer (usually in Doe Foot applicator) and use this brush to blend the concealer on the undereye area and it gives off a perfect coverage.  With the extra product on brush, I sweep it on the sides of my nose, chin and other areas of my face and it immediately covers spots and redness!  I can do my makeup half the time because of this brush, 

My Favorite Face Brushes.  Top face brushes
Oval Brush Brand: Etude House

Thursday, August 20, 2015

AMW Reviews: Sleek Blush in Rose Gold + Online Shopping at Luxola


Hi AMW Friends!  I realized something today that I want to share!
Choosing a blush whenever I go out excites me!  It was funny how I call my good friend Paris B of My Women Stuff a Blush Whore!  I realized, I am turning into one!  Well, I think I am one, I just didn't realize it until today!

It was the day when I received 3 blushes I ordered from Luxola, I was staring at the 3 blushes I got from the packaging down to the color on pan!  I was forcing myself not to swatch or touch it because it wasn't photographed yet!  Then as I was stressed with my day job, I lined all the blushes I own (together with the new one of course) right in front of me and I was immediately transported to a "Good Mood Land"!  Do you feel the same?  Or am I plain crazy?

So obviously, I gave Mr. AMW this "pretty please?" look and he immediately photographed all my new blushes and here I am, using all 3 blushes like crazy over last week and this week!  So I'm sharing my new blush #1.  The brand isn't new to me but the color is!  

Sleek Blush in Rose Gold
Come on!  You have to admit, my cheeks are glowing!!!  Such a pretty shade noh?

Sealed packaging

Thursday, May 26, 2011

AMW Version: Purples without the Black Eyed Peas

Happy Thursday! Sorry for the weird title!  Black Eyed Peas lover out there, don't hate me ok?  I just find the title unique and hoping it would catch your attention! (KSP kasi ako) :P  

When it comes to purples, clients would always shy away and say: "I'm not that fair, it won't look good on me, I'll probably look like someone with black eye!"

I actually went through the similar stage when I was still studying make-up!  There are definitely a lot of practice and a lot of color combining done before I found a way to use purples on a daily basis without looking tired or messy!

Note that this is a toned down version because this look is meant for daytime!  Yes, you can wear it at work without getting strange looks from colleagues!

Tips
  • Try not to pile up a lot with a single shade of dark purple eyeshadow.
  • Use different shades of purples to have "3-dimensional effect."
  • Use at least 2 shades to create a purple look, one is any shade of purple while the other is a highlighter!  Could be golds, beige, etc...
  • Use an eye primer or eyeshadow base and pat on the dark eyeshadow to prevent fall outs.
  • For fall outs, do not use your fingers in wiping them off, gently brush the excess off with a big powder brush or fan brush!  *works ALL the time!*

AMW Diagram

Step 1:
It wasn't shown on photo but I actually applied Urban Decay Primer Potion all over lids.  Applied purple shade from Lancome Color Fan 6 Color Eyeshadow Palette.

Step 2:
With the same Lancome Color Fan 6 Color Eyeshadow Palette, use the shimmery gold eyeshadow on the inner corner of the eyes to create a "brigher" look!  This helps cast away the dark shadow that can make your eyes look tired!

Step 3:
For a fake "deeper set of eyes" look, I used a darker purple shade from my Sleek Divine Graphite Palette.

Step 4:
Apply eyeliner of your choice!  I always go for gel liners or liquid liners!  Pencil liners I use to tight line!


Drew my brows with Paul & Joe Eyebrow Pencil no. 2.  Curled my lashes and used Majolica Majorca Lash Enamel Glamour Volume on Mascara in Black.


Here's a daytime, non-tiring eyes
Workable for office girls!
 

Scroll down to check what's on the rest of my face


For the Face:
Kanebo Revue Powder Foundation BE-C


For the Cheeks:
The Body Shop's Autumn Leaves Compact
in Shade 02 Berry

For the Lips:
Stila Lip Pots in Amande
Top with Stage Wondergloss in Sophia


Get that lazy bum out of your room!
Face your day with a huge smile!  It's Thursday!
Friday is super reachable!


Have you perfected your purple eyeshadow?
What shade do you pair it with?


Keep smilin'
Stay happy!

Thursday, December 2, 2010

AMW Version: "Some Kinda Blue, Some Kinda Purple" Eyes

Ahhh, I can't keep track on the days!  Time is definitely flying super fast, the week went ok, it's finally Thursday!  Friday is just around the corner and I'm looking into a busy weekend!  I am actually looking forward for my brother's arrival!  He'll be coming back for vacation and I'm excited about it!

Today, I will be sharing an AMW Version, I call this "Some kinda blue, some kinda purple" look because the purple eyeshadow I used has a tiny specks of blue that would show up as blue on some angles on camera!  This is as usual, perfect for day time but also for night time if you want by packing up more colors! 

I just realized, that I have a very distinct line on my lids that looked like I've gone through surgery! *laughs*  Beauty Blogger Jess actually asked me about it!  No surgeries though, if ever I did, I'll make it more "deep set" *lol* But I don't plan to because nothing would make me go through that!  I'm just a coward that way!  hehehe


AMW Diagram


Prior to eyeshadow application, you can choose to apply your favorite eye primer.  In this tutorial, I am using the Too Faced Shadow Insurance.


Step 1:
Using a flat shader brush of your choice, I applied a light peachy eyeshadow from the Sleek Graphite Palette all over the lids including the brow bone area.


Step 2:
Using the free sponge applicator that goes with the palette, I packed on the "dark purple" eyeshadow from the Sleek Graphite Palette all over lid area going a bit beyond.  I also include the 3/4 portion of the lower lash line as shown on diagram above.

Step 3:
With my MAC's 226 brush or any "crease/blending" brush that has a pointed tip, I applied Shimmery Black Eyeshadow from the same palette on top of the "purple shadow" done on Step 2 packing on colors until it creates gradient effect (upwards).  At this stage, I am taking time blending and adding up shades as I move back and check my reflection!

Step 4:
Using a Bent Liner Brush from Coastal Scents, I applied MakeupMasala Gel Liner in Inky Black on the upper lash line with a slight winged effect.


** The thing with using Gel Liners, or Liquid liners above the lash line, there's a white space that needs to be covered so I tightlined with Make Up For Ever's Aqua Eyes in Black.


Step 5:
Using Maybelline Eyestudio Vivid & Smooth Liner in Purple, apply it directly on waterline.  Make sure the pencil is not too sharp!

Step 6:
Highlight the inner corner of your eyes with a shimmery white eyeshadow or in this tutorial, I am using Urban Decay's 24/7 Glide-on Eye Pencil in Yeyo.


I added a bit on the brow bone area and blended the shimmery white pencil for that "bigger eyed" look. 


Use an eyebrow pencil of your choice to fill in those brows, 
curl my lashes then applied 3 coats of 
Etude House Proof 10 Henna Fix Mascara in Black


You can choose to apply falsies for a dramatic effect


What's on the rest of my face?


Revlon's Age Defying 2 Way Foundation with Botafirm in Buff


On Cheeks:
MAC's Gel Blush in Just a Pinch
Applied MAC's MSF Blushin SuperDuperNatural!


On Lips:
L'Oreal Colour Riche in Peach Blush
Stage Lipgloss in 12 Sophia


Smile and even without makeup,
you'll look great!


*P.S. My skin is "glowy" in this photo as I have created a tutorial on creating glowy skin and I had to apply a lot for it to register on cam.

Have you sported any colored eye makeup looks lately?
I have to admit, I haven't much, I just did a couple of bright eyed makeup for tutorials
But there's no reason to doll up for now! :)

Keep smilin'
Stay happy!

Monday, March 8, 2010

AMW Version: "Summer Ready" Look

Mak
Happy Monday!!! For a change, my  Monday post will be a bit different!  It's the AMW Version once again!!!  I can't remember the last look I've posted, people who knew me personally knows how hard it was for me to do these looks on those months that things aren't that good.  Let's just say, I am one good example that whatever problems you are having right now, no matter how heavy it is, you know you'll survive it!  No problems can kill you as long as you don't let them rule your life! :)  Now that's a positive way to start the week right?

So here we go!  I missed doing this!  I've created a Summer-Ready look!  I wanted a look that's fresh and perfect for both day and night! 

 Here's my super "on-hiatus" eye! *hahaha*


AMW Diagram!


Step 1:
Choose your preferred eyeshadow base or primer.  Since I am testing this new product I bought, I am using ELF Eyelid Primer.
  

Using an eyeshadow brush, pat on the inner thirds of the eye with Stila's Kitten eyeshadow.


Step 2:
Using an eyeshadow blending brush, I used 72 pcs palette's shimmery reddish brown eyeshadow and gently blend it on the outer corner and above the crease area.  Blending to remove harsh lines.


Step 3:
Using a smaller crease brush, applied deep chocolate brown e/s from the same palette on the outer-v of the eyes to deepen the crease.


Step 4:
Using a bigger fluffy eyeshadow brush, I've used a matte eyeshadow in cream to apply the brow bone area to highlight it.


Step 5:
Create a subtle cat eye with MM Inky Black Gel Liner or any gel liner brand of your choice.


Step 6:
For the waterline, I've used my favorite pencil eyeliner Make Up For Ever Aqua Eyes in 1L or choose to use any eyeliner of your choice.


 Final Summer-Ready eye look


Curl your lashes and add 2 coats of your favorite mascara
I've used Lancome's Oscillating Mascara in Black


Fill in your eyebrows with brow pencil or brow powder


What's on the rest of my face?

For the Face:
Revlon's Custom Creations 020 dial on no. 2
Using Beauty Blender


Set with Shu Uemura's Setting Powder
Using Ecotools' Kabuki Brush


For the Cheeks:
The Body Shop's Kiss of Colour Blush in Vibrant Rose
Using Thevi Dome Brush no. 15


For the Lips:
Clinique Soft Shine Lipstick 
in Blushing Nude


I'm ready to face the world!


But seriously, I'd rather go for "no make up" look on warm weather like this!  But on days that I need to doll myself up!  This is the look I'll go for!  

Hope you like this simple tutorial!
Have a wonderful start of the week!
Keep smilin'
Stay happy!!!