Another brow product! And this time, it is from Sleek MakeUP!
The newest all-nighter product called Brow Intensity is set to be long-wearing and it has a multi-purpose brow tool that I find it quite unique and a breeze to use!
Okay, if you have sparse brows and wanted them to appear fuller and natural? You may want to check out photos after the jump!
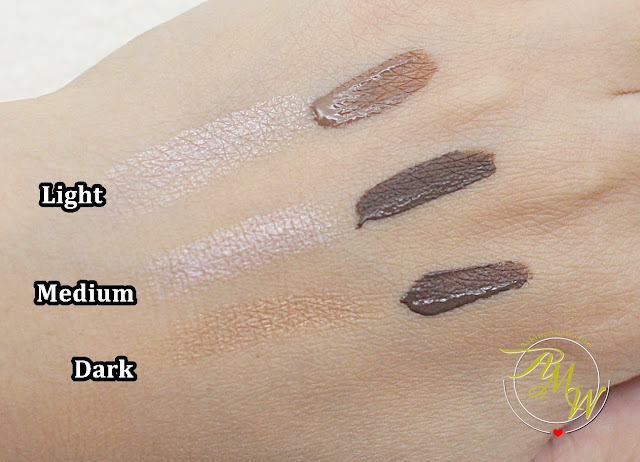
Housed in a pen-type packaging, you get a Brow Sculptor (in 3 shades Light, medium and dark) and a Brow Highlighter pencil on the other side.
Sleek MakeUP Brow Intensity says ---
"Get brows that will stay up later than you do! Shape, sculpt and define your brows your way with our innovative multipurpose brow tool Use the tapered sponge tip to define and sculpt the brush-on fibre gel to add depth and volume, then finish with the creamy highlighter to define your arches."
Swatch
L- Highlighter
R- Brow mascara with a sponge tip applicator to help DEFINE your brows
Shade used on AMW: Light
As much as looking at the brush with a weird sponge tip applicator, I thought it would give me unnatural looking brows! Fortunately, I was wrong! The applicator is short handled making it easy to move around!
Step 1:
Define and fill in brow shape and color using the sponge-tip applicator. Be very careful in application as it sets pretty fast and won't budge! Start at the center of your brows and gentlyl add more hair-like strokes as you go on! Again, be very careful especially if you are using this for the first time.
Tip: Have a q-tip soaked with oil-free makeup remover ready on hand just in case you mess up!

Step 2:
This is the easiest part, to create natural-looking brows and "tint" the rest of your brows, use the mascara side and gently brush off using inward and outward strokes.
Feel free to use a clean spoolie to remove excess product if you over-applied.
Before and After
Step 3:
Apply the highlighting pencil following the arch of your brows. This is also the best way to "clean up" extra stray hairs that may appear too dark or obvious.
L-R Bare Brows, with Brow Intensity and + Brow Highlighter
The brow highlighter can also be used to apply at the inner corner of your eyes to create "awake" look!
Overall, I find this product to be unique, easy-to-use and the result is very natural. The best part? It lasts until make-up removal! It takes extra-effort to remove so I prefer oil-based makeup remover!
The Sleek MakeUP Brow Intensity is priced locally at Php695.00 available at Sleek Counters at Selected SM Department stores. Like Sleek MakeUP Philippines for more brand and product information.
Keep smilin'
Stay happy!


the spoolie of the browcara reminds me of loreal and right I have a hard time using it too. I just hope this one is not.
ReplyDeleteyes, very similar
DeleteNot the most natural looking shade on you but the effect is passable I guess.
ReplyDeleteAnother great brow product to try. And another one from Sleek for sure it will be a hit product for all the ladies who has "Kilay Goals".
ReplyDeletehahaha super daming kilay goals na with all the brow products available.
Delete