Happy Monday! I'm jolly today because this week, there's more exciting things happening for me! Benefit Opening at Greenbelt 5, Christmas Dinner with College friends, then...I'm off to Kuala Lumpur, Malaysia to be an actress! *hahahaha*
Just joking! I'm seriously off to Malaysia but sad to say, I'm not going to be an actress but I'll be joining fellow Nuffnangers for the Nuffnang Blog Awards 2011! Don't worry, I'll definitely share to you my experience and I'll be a good AMW reporter! :)
To my nail art loving readers and friends, no matter how busy I am, I won't forget the Christmas Series!
Last week, it was "Snowman Says "Hi"
This week, it's Rudolf saying: "I have a very shiny nose!"
A lot of you have seen the cameo of Rudolf when I did a review on the 3s Pre-glued lashes. To those who noticed and complimented his "cuteness", Rudolf blushes and says: "Thank you!" :P
Step 1:
Apply your preferred base coat to protect your nails. I finally repurchased my favorite ZOYA Anchor (Base Coat) full size when I visited Digital Traincase's booth at the Moonlit Bazaar.
Apply a coat of your choice of Matte White Polish, then top it with a
glittery polish. Matte white polish is The Face Shop's WH002, glittery
white polish is Caronia Crystal Frosted. Let dry.
Step 2:
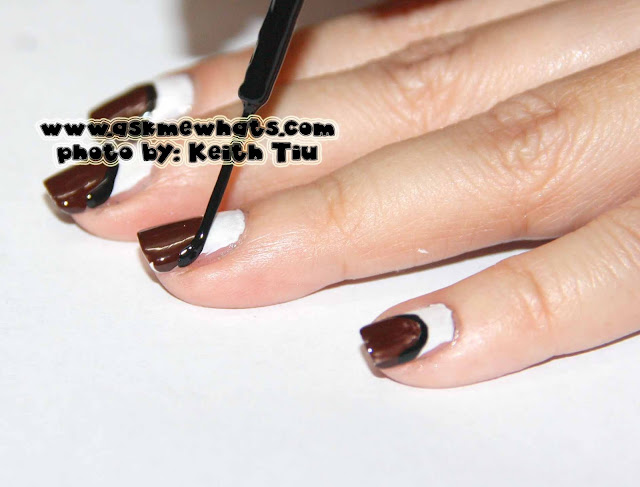
Using any matte light brown polish of your choice, draw an arch as shown on photo below and fill in matte polish. This will be the face of Rudolf!
Step 3:
With L.A. Colors Art Deco Polish in black, draw the outline of the brown created on Step 2. If you do not have L.A. Colors Art Deco or any polish with thin brush, you can use art brushes that are sold in bookstores.
Step 4:
With the same black polish, draw a long line then connect another 2 on each side for Rudolph's antler.
Step 5:
Using a nail art dotting tool, or toothpick, use a matte white polish (used as base) and create 2 big dots for the eyes.
Step 6:
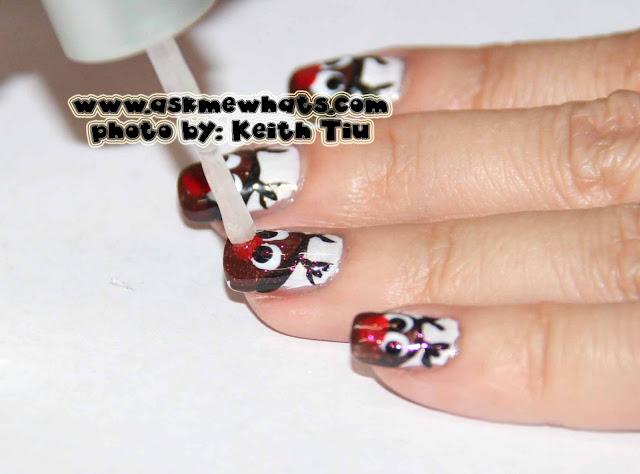
With the same dotting tool, this time, use a bright red polish and dot at the center, for the nose.
Step 7:
Once the white dots are completely dry, use a matte black polish and create a smaller dot to complete the eyes. I place it differently on each fingernail to show Rudolph's different eye expressions!
Step 8:
Once the nail art are completely dry, top the design with a light, shimmery polish to make the nail art more festive and perfect for the holidays.
Step 9:
With the same glittery polish, concentrate more of the shimmers on the red nose. To create a really shiny nose as perfect for the song!
Step 10:
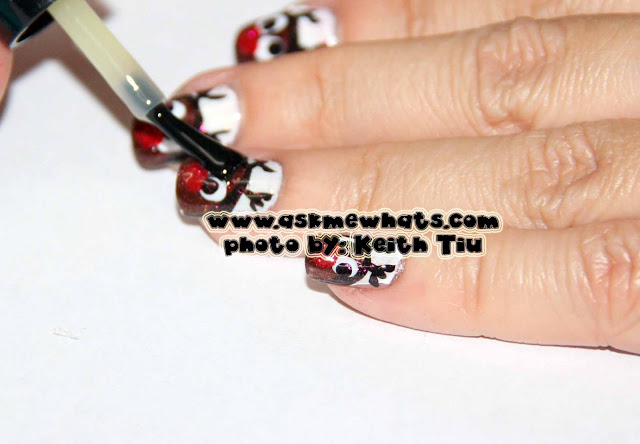
Apply top coat of your choice to protect your hard work.
Rudolph, the Red Nose Reindeer
with super shiny red nose
showing different expressions! :)
How do you like my Christmas series nail art?
Keep smilin'
Stay happy!


This is so cute idea!! I like ur nails very-very much!!
ReplyDeleteRudolph the red-nosed reindeer had a very shiny nose! (like me after a walk in the sun :P )
ReplyDeleteYou're coming to Malaysia? Yay! Don't forget to say hi! :p
Soooo cute!! I wish I had the patience to do this!
ReplyDeleteThose are so so so cute! I love it!
ReplyDeleteWow! That is the cutest Christmas-y nail art ever! :-)
ReplyDeleteThis is adorable! Love it!
ReplyDeletethat's so cute!!!
ReplyDelete❤
http://ilovemakeup68.blogspot.com
Totally feels like Christmas! merry merry!
ReplyDeletehahaha! ang cute ng headband! hello there, RUDOLPH!~
ReplyDeletehaha!
ReplyDeletekawaii~!
i haven't even made up any xmas nail art yet
i have to try making nail art designs now...
@Anastacia Thank you dear! Come to think of it, I LOVE YOUR NAILS so much too!
ReplyDelete@Paris B Ohhh, I'm going there but I'm probably too busy to meet you ! :P lol!!!!
ReplyDelete@Eugenia It's not that hard :) I'm sure when you get the chance, you'll do well!
ReplyDelete@Adrienne Thanks!
ReplyDelete@Lootwagon Thanks for liking them.. Rudolph is very very happy! :)
ReplyDelete@gio Thank you :D
ReplyDelete@Jess Thanks!
ReplyDelete@Jamilla Camel My nails feel the Christmas Spirit, I don't! been too busy nowadays :) hehehe
ReplyDelete@thebananniery I know! The headband was given to me by a friend because I borrowed it for a Christmas Party! Glad I kept it and it's been with me for 3 years :D
ReplyDelete@~tHiAmErE~ Busy ba ? :)
ReplyDeletethis is soooo cute! hihihi....
ReplyDelete@Issa LIKE ME! ay on second thoughts, no na lang! I don't want to have red nose! hhihihi
ReplyDelete@Askmewhats: Oh boohoo! :P
ReplyDelete@Paris B I'm meeting a couple of red-nosed reindeer though :P
ReplyDeleteThanks for your comment Nikki!! Really cute nails - they are just perfect for the festive season!!
ReplyDeleteWish I'm as creative as you are! I can't even draw a flower on my nails :)) Good job Nikki!
ReplyDelete@Nic Nic Thanks dear!
ReplyDelete@Joylyn Sayson Soon to be mommy Say :) I'll see you around!
ReplyDelete