These are just some of my nail art designs for the end of the year! It was simpler and easier than my usual ones but I find the designs and color to fit the happy occasion.
This nail art design reminds of of Lanterns. The colors are very Asian.
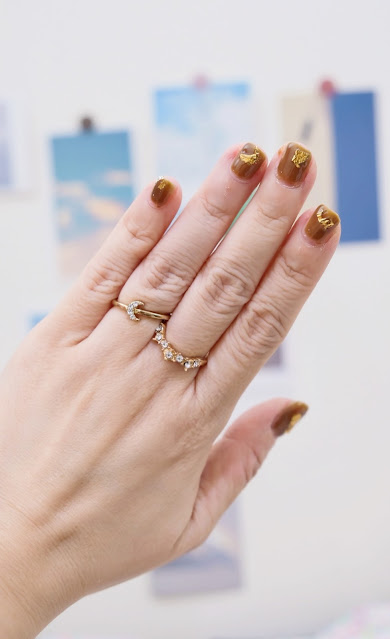
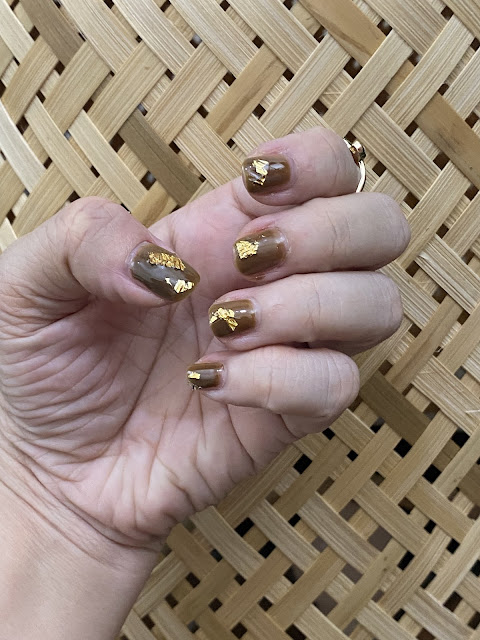
This nail art design was inspored by sparkling decors for Christmas Tree! I lvoe using dark brown base for a change instead of the usual Holiday colors. I find this shade classy!
Lastly, totally unrelated to Holiday season but I wanted something chic and simple. Flowers may not bloom in countries with winter season so I'd rather have them permanent on my nails for a while :D
Hello everyone! My nails missed you all! Can you imagine how I used to do different nail art designs on a weekly basis? That's almost 50 nail art designs in a year!
Since things has been super busy - very hands on mom, no house help to help me do chores so I cook a lot and work at the same time, doing nail art is a luxury!
Thankful that I have home UV gel KIT from Cathy Kathy to help me create faster and easier nail art designs with no waiting time for drying!
I've always wanted to do Philippine related nail art but I understand how people could get really sensitive nowadays! So I try my best to do representations instead! I picked the Philippine Flag colors and drew 3 stars and Sun with 8 rays.
I hope you like this!
Polishes used:
Base and Top Coat by Barry M All-in-One Nail Hardener
Blue shade - Orly It's Britney Bitch
Red Shade: Sally Hansen Complete Salon Manicure in Red Handed
Yellow - GirlStuff Nail Polish in Lemon
White - Revlon Gel Envy in Sure Thing
Happy Philippine Independence Day to my fellow Filipinos!
I am so happy to share that I'm back with another gel nail art! I did not take a video of this as I only have 10 minutes to do my nails before I shower my son!
With 10-minutes - the best way to make beautiful nails is to use UV Lamp!
This was done quickly in a flash and I am so happy with the result! By the way, I also shared on Instagram a tip for those who have Contact Dermatitis like I do. I have been taking medications and I've stopped wearing polish for a long time. Now that my hands are healing, I want my hands to look good but NOT suffer!
A quick tip? Apply your polish far from your cuticle! Do not make the polish touch the cuticles because that's where my allergies start! I've noticed doing this application keeps my hand free from allergies. Of course, if you have super bad dermatities - do not wear polish at all!
This tip is perfect for those with mild condition!
I'm back doing nail art once again because as you all know, I stopped when I turned into a mom! Taking care after a Baby, then Toddler is NO JOKE! It is true what most people say, you don't have time for yourself even a single application of nail polish became a chore!
Now that my son is 9 years old! YES! Time flew by so fast, I have the option to do some self-care routine even if I have to wait for wee hours of night when he finally fell asleep! (Not complaining here!)
I think the collection has a total of 6 shades and I got 4 our of the 6!
L-R Artist's Garden, Bleu Iris, Dance with Me, Golden Afternoon
The ORLY Polishes are know to be silky creme shades, easy to apply with the flat brush and dries up easily! If applied correctly, you don't have to worry about chip!
As always, whenever I get a "collection", I try to use all shades proving how a collection really complements each other!
How do you like this look?
ORLY Polishes are available locally at Purebeauty.
(Author got sample sizes but full sized Orly Impressions polishes costs Php395.00 per bottle.)
To our Muslim Brothers and Sisters, you know that we may have different religions (just like how we have different Political Beliefs in times of election.). I want to wish everyone peace, safety, protection and good health!
Happy Eid Mubarak!
I know this art isn't perfect, Look at my moon! My brush is just wonky! But I poured my heart out drawing each nail! Hope you like it!
I have been checking out talented nail artists in Japan, Taiwan and Korea on my Instagram account and I got inspired to do Marble nails using gel nail polishes!
Given the chance, I’d like to do it on regular polishes more since my nails are weak and I prefer to change my polish at least once a week. But because Marble nails are quite tricky to do cosidering you need a dry base - plus busy hands on mom here! UV Gel Polish is the way to go for no.
If you do Marble nails, do not expect each nail to look uniform, some “marbling” will come off obvious while some are subtle making it a nice contrast. I also added glitters because nail art designs look 10x better with glitters - that’s my humble opinion by the way!
How to do Marble Nails using UV Gel Polish —-
Clean your nails.
Apply a base coat (cure for 30 seconds)
Apply a base color (any color you choose as base, could be light or dark). Cure for 60 seconds.
Apply a 2nd base color (do not cure), top with white gel polish and gently swirl both colors together using a dotting tool, a toothpick or any sharp tipped opject.
Once you are happy with the result of the “marbling”, cure for 60 seconds.
Add random glitters if you want.
Use UV Gel Top coat and cure for 60 seconds.\
To make it more clear, I’ve done a quick video below. Happy watching!
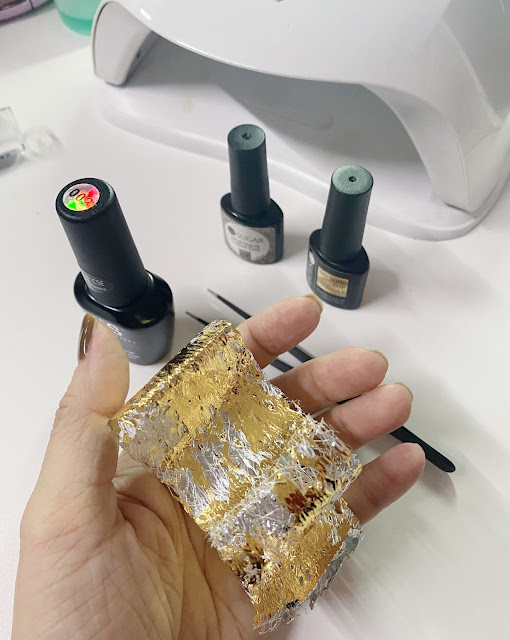
I have been following Nail artists from Korea, Japan and Taiwan. I am envious of their “jelly nails” and wondered how it was done.
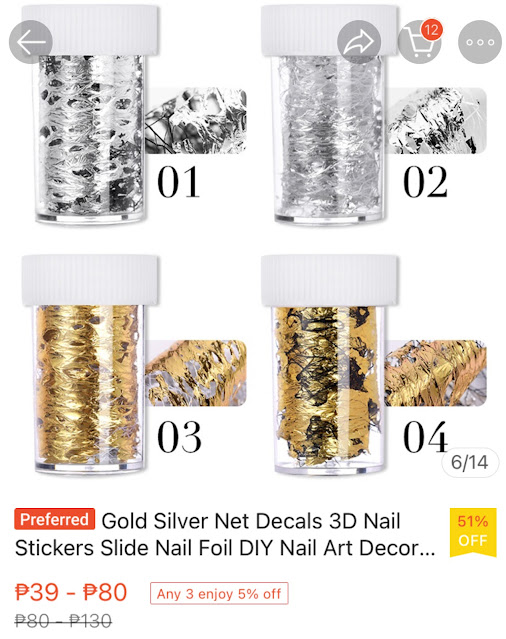
With constant research + All thanks to Lazada and Shopee, I was able to purchase Gel Nail Polishes that are meant to have jelly, shiny nails outcome. I also love how they added a new element like Foil and I actually bought gold ones so I actually tried this nail art design for the first time and it took me less than 10 minutes!
I ordered from the Shopee store URSugar and you have several options.
Here’s how mine looks like, I bought option 3 and it came rolled inside a plastic bottle, all you need to do is to cut the right size/piece and press it on top of UNCURED Gel Polish layer and top it with top coat before you cure it together.
The result? I love it! There could be some random sharp edges from the foil, you don’t have to worry, all you need to do is gently file it once the gel polish is completely dry!
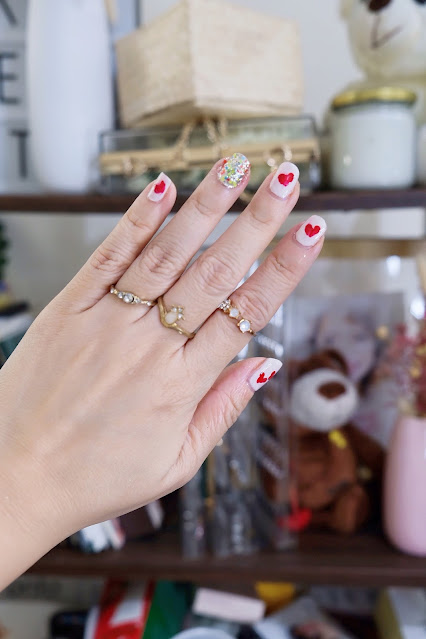
Well, I had to pair it with Valentine’s Day Nails of course!
I used Gel Polishes for this because I only have 15 minutes to create this nails and it is easier to “draw” with a completely dry base. That said, you can actually still do this with regular polishes!
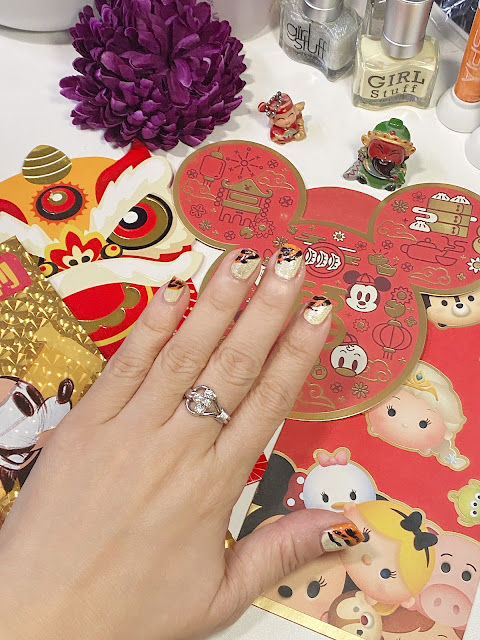
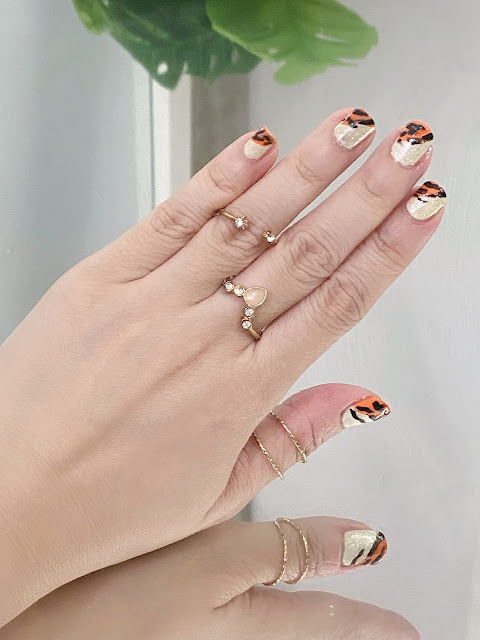
Hello AMW Friends! Happy Year of the Water Tiger!!!
Ah, as much as I’d like to draw a cute Tiger on my nails like I used to a decade ago! I’ve decided to make it simpler and …ahem…more age appropriate!
How do you like this?
My nails aren’t perfect, I haven’t gotten a chance to really buff and clean my nail cuticles —- COOKERIST here LOL! So without further excuse, here’s a better look.
Products used —-
Base Coat: ZOYA Anchor Base Coat
Girlstuff Away from It All - Light Yellow base shade
Ah, I have been so busy to even have time to fix my nails! I thought I have A LOT of time when I don’t need to drive my son to and from school, no need to attend events or go out in general.
Boy was I wrong! I am not complaining though, I am grateful for the opportunity to be able to stay at home with my husband and son as I do the things I love to do at the comforts of my home!
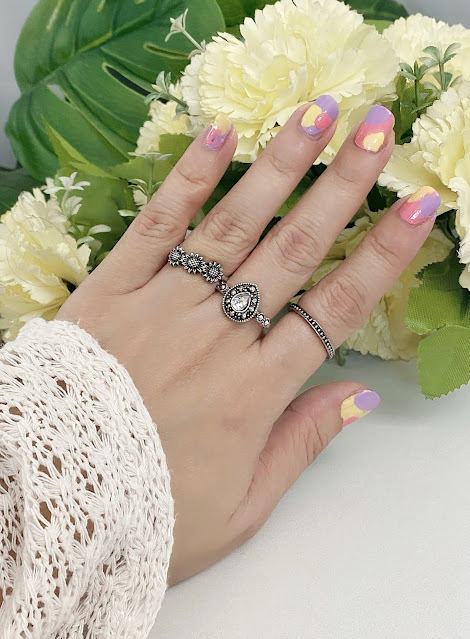
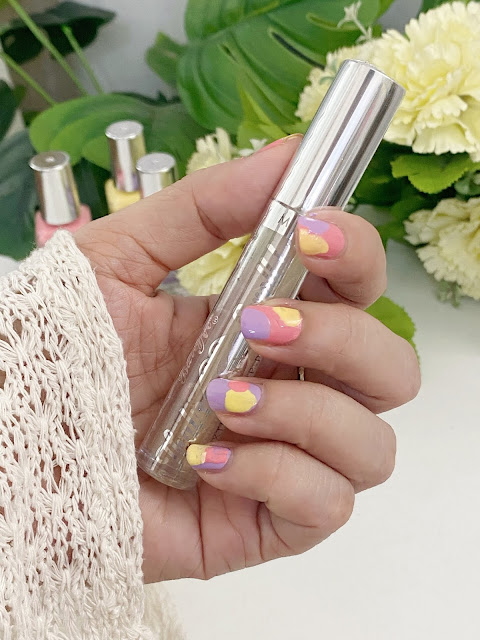
So I recently got new shades of Barry M Polish. They are in pastel pink, yellow and purple! All shades work well even when worn together. Just take a look!
Shades: Raspberry Ripple (Pink) Lemon Sorbet (Yellow) Grape Soda (purple)
Best of all, the Barry M Polishes are quick-drying, very pigmented and the brush is perfect! I have issues on nail polish brushes that do not work well because application will fail on a no-good applicatcor!
They were actually on 11.11 sale and they extended it until today! Their polish priced originally at Php249.00, these are on 20% sale making it Php199.00 a bottle! Sulit siya kasi maganda promise!
I was able to score this freebie lip gloss for FREE! I think as of the moment of cheecking, they give free card holder for every purchase! I wish you get them for free!
Today is September 2 and I didn’t even get to enjoy the first day of September. Things are going so crazy here at home I cannot believe the lockdown started with me counting every single minute as the days go by like a turtl. Nowadays, with Kyle’s online class starting again as 3rd grader, me cooking 2x a day for 2-3 families at times. Adding to my workout (to keep myself healthy and energetic) plus the PR work and my love for nail art, I find myself chasing after every single minute watching the clock every 5 minutes!
That said, even my nail art tutorials turn simpler, and I have been relying on UV Gel Polishes more and more because after taking this shot, I was off to do another task! And it was a task with the use of hands of course!
I recently got newer Gel Polish shades from both the Tokyo Collection and Nordic Collection, I have decided to create a simple art that screams —- CHILL. Because I need to be chill whenever I look at my nails!
I also got to try their Peel Off base and as opposed to what I did on the video, the peel off base does not need curing so I will definitely try it again without curing soon!
The rainy days are really here! It has been raining nonstop for good 6 days to almost a week and the Philippines is suffering in terms of Flood and extreme traffic. I wish things will be better soon not only for our nation but also for other countries.
Since I am still stuck at home - PANDEMIC + STRONG RAIN
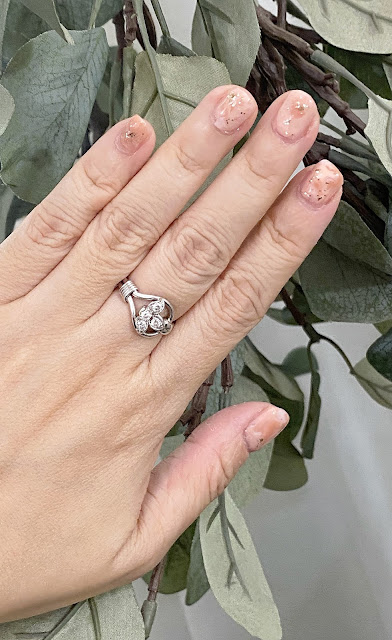
I don’t want my home life to be “shi**y” as they say, so I’ve decided to pain my nails quickly and do a simple nail art. I am inspired by the dainty pieces I own (rings!) so here you go.
I haven’t been doing nail art much when I turned into a mom but things are starting to go back to the usual....well, the nail art and nail polish application but NOT the super crazy nail art designs or complicated ones like my PHILIPPINE INDEPENDENCE DAY Inspired Nail Art Tutorial Last 2011.
This particular nail art design inspired by the colors of Philippine Flag was done in less than 10 minutes with my inquisitive 8-year old son hovering around grabbing every single polish on my hand asking me: “What shade is this?” Constantly! Hahahahaha
Thankful for Gel Polish as I was able to do everything and not worry about having my nail polish ruined!
The Philippine Flag consists of Blue, Red, Yellow and White.
The National Flag of the Philippines features two equal horizontal bands of blue and red. The blue color stands for peace, justice, sacrifice, and truth. The red color symbolizes bravery, courage, and patriotism. The white triangle represents fraternity, liberty, and equality. The center of the triangle is a golden-yellow sun with eight primary rays, each representing a province At each vertex of the triangle is a five-pointed, golden-yellow star, each of which representing one of the country's three main island groups—Luzon, Visayas and Mindanao.
I know people are more sensitive nowadays with anyone wearing the Philippine flag as clothing or people are even bashed using the flag as accessory. So I don’t want to make people sensitive about this so I did not draw the Philippine Flag on my nails to respect the flat and its’ people. I used the colors instead. So please...don’t bash me :P
It isn’t perfect as I am being disturbed by my 8-year old son while I was doing this!
For the base, I found a perfect color in Cathy Kathy No Soak Gel Polish in shade 13. I used a gel polish underneath so I don’t need some waiting time to be able to draw on top of it!
This year’s Easter, still stuck at home! Thankful that my son got used to the lockdown life and did not expect much! All thanks to many online sellers though and delivery guys, I was able to purchase plastic eggs and toys and create simple Easter Egg hunting at the comforts and safety of our homes.
Now on to my nails, I usually draw Rabbits or eggs but this time, well, for someone of age :P I’ve decided to make it simpler, thinking about the exterior look of Quail Eggs (because I just cooked them with my Birthday Noodles!) I’ve decided to use Easter Egg Pastel colors as base instead and use a simple mascara wand in creating random Quail Egg-Like dots!
If you are a long time follower of Askmewhats’ Blog, you’ll know that Nail Art plays a huge role in my life! I have been doing nail art for so many years and have done various designs!
It stopped when I gave birth to my son and I just find it hard to juggle between motherhood and nails - let’s face it, what’s the point of having cute and beautiful nails when it has to be short all the time for my baby’s safety?
Now that he is older, I am going back to doing nail art because —- you wouldn’t believe what I’m going to say —- My son actually awaits for new nail art! He would say “Mommy, where is your March Nails?”
Obviously, my son is exposed in the “Beauty World” where his mom lives in ! :)
So recently, I was contacted by the brand Cathy Kathy to try out their products without the pressure of posting! They just wanted me to try it while I record it and maybe, let them know if I like the products are not. Without the pressure - plus the products are made in Japan. I said yes because I really want to see how good “home Gel Polish” would be.
I always have my heart on regular polishes with the challenge of wet base while I do my nail art designs! I mean I always prefer the harder and hassle route #NOT :P
After trying out Cathy Kathy Gel Polishes, I COULD be a convert! Could be in a sense that I love how shiny and perfect my nails look! How easy it was to do nail art as the base coat are completely dry! How I can easily continue with my day to day activities without having to worry about smudging my nail polish!
The only downside? The exposure of UV Light! I mean the brand did say it isn’t harsh but I can literally feel the heat whenever I put my fingers inside the UV Lamp!
That is my ONLY CON! But overall, I am saying this for the brand and only brand I used as of the moment - this brand is amazing in a sense that these are SOAK FREE! I dislike Gel Polishes because of bad experience with soaking and removal - my nails were PAPER THIN when it was supposed to be done professionally but they obviously didn’t know what to do!
With that scare, I swore of Gel Polishes forever and this brand changed that! They have Nail Polish Remover that can remove gel polishes with NO SWEAT.
Best of all, I’ve had this nail art for a week now, I cook, wash the dishes and do a lot of stuff and it remained fresh as freshly applied! No Chipping (as long as you apply them well!)
I won’t blab more, watch my quick and easy-to-understand tutorial coming from someone who was literally using this KIT for the VERY FIRST TIME!
Can’t wait to use more of these products and create more art for you guys!
What can you say about my FIRST EVER GEL POLISH applied at home?
For more information follow Cathy Kathy on Instagram