Showing posts with label The Face Shop. Show all posts

Friday, July 19, 2019

AMW June Favorites


I have been sharing my monthly favorites ever since late last year on IG Stories and only until today I get to save them up and post them just for "reference".  I mean, sayang ang hardwork to do all those stories and for them to be gone in 24 hours!

Please watch and enjoy my June favorites and do comment and list down your own June 2019 favorites!


Do you have a favorite from the items I mentioned?
What are you looking for July 2019 Favorites?

Keep smilin'
Stay happy!
 

Thursday, December 27, 2018

GOT7 Fans, Hear Ye!


GOT7 Fans, are you into JB, Mark, Jackson, Jinyoung, YoungJae, BamBam or YugYeom or all of the above?

I have to admit, I "Google-d" their names as I am NEVER good with names but I am great with faces!  I've been seeing them online because I stalk videos and watch them and enjoy them at wee hours of the night even when you think I'm being Tita, I am actually a teenager at heart *ahem*

If you want to own this similar poster I have, well, it's time you rush to your favorite The Face Shop stores because they have a limited edition box called GOT7's Pick! 


The box contains The Face Shop Best Top3 Items.

Renewal Yehwadam Heaven Grade Ginseng Rejuvenating Serum
Dr. Belmeur Daily REpair Panthenol Soothing Gel Cream
The Face Shop Anti-Darkening Cushion 


Renewal Yehwadam Heaven Grade Ginseng Rejuvenating Serum - this serum is best used after toner application and is said to offer hydration all throughout the day.

Dr. Belmeur Daily REpair Panthenol Soothing Gel Cream - this product I am most excited to use because it is meant to calm down and heal sensitive skin by improving moisture retention.  This is best to be used as a final step in skincare routine to seal in moisture and prevent previous skincare products from escaping out of your skin.  This contains 2.5% Panthenol and is gel-type cream.

The Face Shop Anti-Darkening Cushion - if a cushion has "anti-darkening" named after it, it must have high SPF and after checking out product description, I am right!  With SPF50 PA+++, this can be used alone on regular days without much sun exposure.  This product contains sebum controlling ingredients thus I am wondering how this would work on my normal/dry skin.  

Will keep you updated on these 3 products, let me know if you want in-depth review on some of the products mentioned here!  

Are you a GOT7 fan?
Do you like any of the items featured here as their top 3 picks?

For more information, Like The Face Shop on Facebook and Follow them on Instagram.

Keep smilin'
Stay happy!


Friday, April 8, 2016

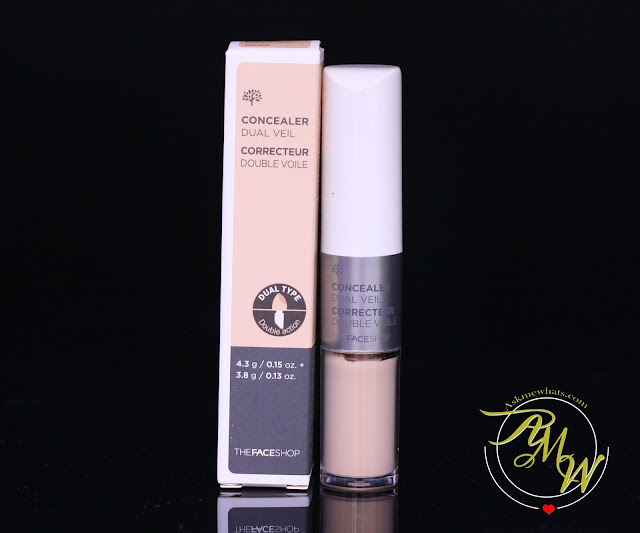
The Face Shop Dual Veil Concealer Review


So who loves concealers?  I know I do!  That's one of my favorite step in makeup artistry because I get so challenged!  Especially when it comes to clients coming up to me worried about certain skin issues on their most special day!  I'd wish I could whip out my magic wand and say: "Let me do the magic!"  (But they'll probably find me weird and not hire me in the future!  lol)

So everyday, I try to practice, read and research about various concealing techniques!  So when I saw a Dual Concealer from The Face Shop, I make it a point to grab and test this out! 

A photo of The Face Shop Dual Veil Concealer

I picked this particular concealer when I was online shopping at Althea!  Thankfully, I got the perfect shade! 

Thursday, October 22, 2015

AMW Reviews: The Face Shop Oil Control Water Cushion (V201 Apricot Beige)


Guess what?  I was indeed very excited when I got The Face Shop's Oil Control Water Cushion as part of my BDJ Elite Box recently and I road-tested it right away.  

I missed hovering around TFS looking for what's new and hot!  I haven't been going out just to "shop" nowadays due to my intensely busy schedule but I am so happy God gave me ways to still be up-to-date with the things I love to do --- trying and testing out skincare and makeup products.


A photo of The Face Shop Oil Control Water Cushion

For my type of skin, I believe "Cushion" type of foundation is a key for that dewy finish.  I've tested out a couple and this one I believe is the most unique because most cushions I used caters normal and dry skin while this one from TFS is said to work even for oily-skinned users due to its' "Oil Control" function and yet, still moist enough even for my skin type!

Friday, October 2, 2015

Unboxing: BDJ Ber Month Beauty

So I got extremely excited in receiving an Elite Box from BDJ Box!  This is their Ber Month Beauty box that includes items I can't wait to use, have used but loved or some worth sharing to my family and friends!


In one glance, which particular product caught your attention?  

Wednesday, October 31, 2012

How to: Speedy Office Makeup


A 30-year old mom and a newbie when it comes to makeup emailed me last month to ask for advice on how to create speedy makeup that doesn't require a lot of time and money! 

Thanks AMW reader "M" for entrusting me your makeup queries.  I have finally gotten the chance to create this post hoping I'm not too late!

Some important notes she mentioned ---
  • She currently uses powder foundation and lip balm.
  • Suffers from severe chapped lips so she's not into lipsticks.  
  • Needs to be in the office as early as 8:00am and needs to be on field and out under the sun.
  • Skin type: Oily.  Skin concern: Dark under eye circles.
  • Requested for simple yet polished look as she gets overwhelmed with all the makeup products she sees on my blog!
Spots, Under eye circles, Blemishes, Acne Marks, etc..
To look presentable, no matter how in a hurry you are, invest on a good concealer!  If your biggest problem is the darkness around the eyes, invest in a salmon colored concealer.  If red acne marks are the villains in your life, go for a green corrector.  It is very important to take a look at your major issues and let's start from there.

Whenever in a hurry, I can skip liquid/cream foundation and just apply concealer quickly on my problem areas.  In my case, it's the dark circles around the eyes and some red spots on the sides of my nose.  If you're on a tight budget, you can pick your current foundation and apply it only on problem areas and leave the rest of your "good skin" to breathe.

Note: Read SAVE vs. SPEND Concealers HERE
You can also check out tips on how to spot conceal HERE

In this photo: AMW used Revlon PhotoReady Concealer in Light Medium


After concealing, I've decided to give powder a skip and proceed in doing my eye makeup.  I tend to have some "fall outs" that may need some cleaning up at the latter part of my makeup application. 

Saturday, August 25, 2012

AMW and Char Char as The Purple Groom's Brand Ambassadors

When The Purple Groom contacted me and Char Char to be one of their Brand Ambassadors, I did not hesitate one bit as I want to have good memories and photos with my furry friend Char Char.

Char Char's mom Lucky was a gift to me by my uncle, when Lucky gave birth to Pudding and Char Char, she underwent caesarian operation in which Lucky turned out not to recognize her puppies!  Because we don't want Char Char and Pudding to die out of hunger, my mom and I took turns feeding them every hour for the next 3 weeks.  It was a difficult task but I didn't mind at all as I love them dearly.

Fast forward to 7 years after, I'm glad to have this chance to share to the world how much I love dogs in general!

It was a lovely day at The Purple Groom, California Garden Branch.  The store is quite huge as compared to other pet grooming stores I have been to. 

I was told that The Purple Groom offers no-frills complete grooming package for our pets.  Groomers are certified licensed dog handlers who can make the grooming experience comfortable for our lovely friends!  And the cute mission?  "Is to make every pooch happy and clean".  Don't we owners love that?


Since it was a photoshoot with the owner, yours truly was also groom *ahem* made up!


Melai from The Face Shop, did my makeup using all The Face Shop products except for the Glambox Mink Lash that I brought and my Revlon Just Bitten Kissable Balm Stain in Lovesick Passionnee in which she happily helped me applied.


Thank goodness Ed from Bench Fix Salon was there to help me style my hair!  I was in a rush that morning so my hair looks limp, straight and boring!


Of course, while I was made up, my dearest Char Char is also going through his own makeover!


Thanks to a fellow pet-lover photographer Benjie Tiongco from Benji Tiongco Photography for the patience and the directions!  He definitely knows how to take good angles not only on human but pets as well!

 
**photo taken from The Purple Groom Facebook Page
 Some of the shots taken by Mr. AMW
Char Char was well behaved!

Hugging my baby!
Check out Char Char's expression!

And of course, the star needs to have his own photoshoot

Mr. AMW and Char Char
Char Char was obviously exhausted but still managed to look at the camera

The glamorous life is definitely not for him! :P

Thanks to The Purple Groom owner Jayme Chua, who at the end turned out my friend's cousin!  (that's a small world!).  
 

For your pet grooming needs, feel free to visit The Purple Groom at the following branches ---
  • Pasig (Tiendesitas)
  • Quezon City (Xavierville)
  • Cainta (Greenwoods)
  • Mandaluyong (California Garden)
  • Home Service (Metro Manila)
**Don't forget to Like them on Facebook

I'm not endorsing them just because they had me and Char Char as their Brand Ambassadors.  Just look at how lovely Char Char looked after the grooming.  I am satisfied and happy with their service!

Where do you bring your lovely pooch for their grooming needs?

Follow AskMeWhats on Twitter 
Get "photo-updated" on Instagram (search "AskMeWhats")
Keep smilin'
Stay happy!

Tuesday, August 21, 2012

Readers' Corner: Making Nail Polish Last For At Least A Week!

I've had nail polish on toes and fingers for as long as I remember!  I think I started experimenting when I was graduating from high school and since it was okay to wear polish in college, that's when I experimented on different colors!  

And to answer your question, I had trouble applying polish on my right hand as my left hand tends to be wobbly!  I even had to save up on French Tip stickers just because I can't draw a straight line!  If I may repeat myself: "Yes, Practice makes almost perfect." 

When friends see my nails, the first thing they would tell me is how they love to put on polish but it never lasted on them!  The maximum I heard was 3 days and no one believed me when I told them mine can last a week or more!  And mind you, I'm not the li'l princess you think I am, I wash dishes and do household chores! 

So today's feature on Readers' Corner, I'm creating a quick, simple tutorial on how to make your polish last!  Not exactly a week but at least a bit longer!

Here are the 3 basic nail products you need ---
Base Coat, Top Coat and Fast Dry 

If you're on a budget, it's just base coat and top coat!  That's enough!

L-R The Face Shop Top Coat, Seche Vite Dry Fast Top Coat
 and Zoya Anchor Basecoat

Some important things to remember:
  • Do not wash your hands 10 minutes before you apply polish.  Why?  The water from your nails will evaporate thus forming bubbles.
  • Do not apply hand lotion, facial creams prior to nail polish application, the oils from those products may stick to your nails.
  • Do not shake your polish hard, try to roll them between your hands.
  • Apply polish in a cool, dry place.  
  • Never apply polish in front of a fan.
  • Apply with a thin coat first and wait for the first layer to dry before you apply the second coat.
  • Once the consistency of your polish is dry and thick, throw them out instead of trying to save them from death!  *laughs*
Step 1:
You can wipe your nails with a clean cloth making sure they're dry and clean.  Apply a coat of your choice of base coat.

Do not forget to "wrap" even the edge of your nails!
This is called the wrapping technique.
Step 2:
Pick a polish of choice.  Once the base coat is dry, apply a thin layer of your preferred polish starting from the center working left and right.


Again, wrapping technique should also be done!
Continue step 2 once the first coat is dry.


Step 3:
Once your preferred polish shade is completely dry, apply a coat of your favorite top coat.  I've been a loyal user of The Face Shop top coat.  So far this works for me! 

Step 4:
Once top coat is dry, this step is optional, I picked my Seche Vite Fast Dry Top Coat and apply it all over the nails!  After several usage, I agree that it is indeed the best quick drying top coat to date!

 If done all the steps properly and with loads of practice, you may enjoy your lovely polish for a week or even 2!  
 If you managed to try these steps, feel free to comment and let me know how it went! :)

Any other Long lasting nail polish tips?

Follow AskMeWhats on Twitter 
Get "photo-updated" on Instagram (search "AskMeWhats")
Keep smilin'
Stay happy!


Friday, August 17, 2012

Nail Art Tutorial: Big vs Small Game


Happy Friday guys!  The week went by pretty quickly, I guess it's because my brother is here for a short visit and he's leaving on Sunday!  

Anyways, on to the good-but-useless news!  *hahaha*  I got my own Resort's World Card! *yay*  Hey, don't give me that shocked look lady!  I'm not a gambler and will never be, but I won't be a party pooper inside a casino!  I'm scared of losing huge amount of money so I always set a side a very small budget just for the experience and fun!

And one game I would totally try aside from the Roulette?  It's the Big vs. Small game!  My brother and I played the game once inside a hotel in Macau and my bet was multiplied by 2 and I immediately cashed out!  (I'm a sissie that way!)  hehehe  My brother, on the other hand, has the luck, his bet was multiplied by 16 but he continued to play and before we get to zero, I asked him to leave!  So yes, I'm nagging gambling partner!

Today, I've created a nail art design to celebrate the game I can play at the casino.

My Big vs. Small Game Nails

Step 1:
Apply coat of your favorite base coat to protect your nails from chipping and yellowing.  I used ZOYA Base Coat

Friday, August 3, 2012

Nail Art Tutorial: Dainty Tri-Color


Nail art tutorial time!  I am so happy that a lot of people are trying nail art designs nowadays and I tend to smile when I see random people having cute designs done on their nails!  I guess, it's just that, I came to realize how different a person could be, there will always be some similar interests which makes the world such a wonderful place to live in!

Since I was a bit in a hurry to do my nail art for the week, I've decided to make it as fun, quick and easy!  

My Dainty Tri-Colored Nails


Step 1: 
To protect your nails from all the chemicals, apply your choice of base coat prior to nail polish application.  As of the moment, I am using the ZOYA Base Coat which is my favorite!

Next, paint your nails with a white colored polish to make your nails appear more vibrant. I applied 1 coat of Orly Nail Lacquer in Daylight.  Let dry.

Monday, July 23, 2012

Nail Art Tutorial: Dots, Sparkles & Colors


I've had my Aztec print inspired nails for more than a week and I found myself checking them out once in awhile for inspiration and probably just to uplift my mood!  For such a quick glance, it does give me the sense of colors and happiness and I find it a bit difficult on my part to remove it after both nails on the pinky fingers have already chipped!

Instead of gloating on losing colorful prints, why not create another one that's even brighter and more colorful?  This nail art suits the dark, gloomy weather over the weekend!

a photo of nail art tutorial

Step 1:
Apply your preferred base coat prior to any nail polish application, as soon as the base coat is completely dry, apply 2 coats of a neutral, peachy-nude polish shade and let dry.  In this tutorial, I am using BW Nail Polish gifted to me by my friend.


Thursday, July 12, 2012

Nail Art Tutorial: Aztec Print Inspired


I got inspired by the clothing piece I saw during the Roxy Let the Sea Set You Free event last week!  Both Earth and I were in love with the Aztec print top which, unfortunately, doesn't not have our sizes anymore!  


If I can't wear it, I'll draw it instead!  Not on my body you silly!  *winks*  It was my nail art inspiration for the week!  Hope you like it!

a photo of Aztec Print Inspired Nail Art Tutorial
Relax!  It's not as difficult as it looks!  It's actually one of the easiest nail art to do since you don't need to do a lot of strokes but lines and dots!  The only hassle would probably be the changing of nail polish shades!

Friday, June 22, 2012

Nail Art Tutorial: Pow! Bam! Boom!


Happy Friday and it's Nail Art Tutorial Day!  

How's everyone?  I'm sure we're all in high spirits because weekend is within our reach!  As for me, it'll be a very busy day of errands plus, I get to meet my past colleagues for catch up tonight!  

As for my nails, I've done The Avengers and DC characters and while I was looking at my nail polish collection, I've thought of creating another colorful nail art to brighten up the rainy season but I want to veer away from the usual Superheroes' Chibi faces!  

Yeah, I think a lot!  *laughs*

Anyways, back to the story, I've decided to re-create how Superheroes would react on a fight scene!  Yes, I know some of you weren't even born yet! :P

a photo of Nail Art Tutorial: Pow! Bam! Boom!

Here's the famous Crash! Kapow! Zlonk! from Batman and Robin circa 19-forgotten! :P


Saturday, June 9, 2012

Nail Art Tutorial: DC Superheroes

Hi! Happy Saturday!!!  I finally found the time to fix my Nail Art Tutorial Photos!  Since my last "The Avengers" Nails, Mr. AMW requested I continue the Superhero-inspired nail art!  As we looked at our tiny collection, I saw a very cute mug that I bought for Mr. AMW from a Bazaar at the World Trade Center. 


DC Superheros in Chibi form :)

a photo of DC Superheroes Nail Art Tutorial

As I applied a good base coat to protect my nails (from Zoya), I looked for a nice color for the faces of the characters, since I can't find one, I've decided to mix GirlStuff Nail Polish in Machiatto and Caronia Regular Polish in White Satin.


Thursday, May 17, 2012

Nail Art Tutorial: Sunkist Nails

Happy Thursday!  Good morning! Good afternoon!  Good evening! :)

Wherever you are in the world, I hope my simple nail art tutorial gives you the boost of "Vitamin C"!  I did not intend to create a "Sunkist" inspired nail art!  I was just swiping on a nice orange shade from Color Combo (thanks Bee!) then it all turned out perfect for the summer!

My Sunkist Nails


Step 1:
Apply a base coat prior to nail polish application for the protection of your nails.  Apply 2 coats of Color Combo Nail Color in CBL10 or any orange shade available!

Wednesday, May 9, 2012

Nail Art Tutorial: Daisies To Cool Me Down This Summer

In the middle of ANY stressful day, I have this secret that keeps me cheerful and positive!  Yes, I will share it to you today because it works for me and MAY work for you! :)

I like going to Google Images and search for random photos from "Cute Dogs", "Cute Cats", "Cartoons", "Flowers" or simply typing "Funny Photos".  There's one photo that totally brightened my day and I've come to realize I haven't drawn this on my nails!  

**photo from Source

And here's another one that gave me the total inspiration....

**photo from Source


Thursday, April 5, 2012

Nail Art Tutorial: Maneki Neko Nails

Good morning!
Everyone knows how much I like to create "themed" nail art designs when I travel!  Since I'm in Japan, some expected nail art designs would be the Japan Flag or Cherry Blossoms!  Japan Flag may be nice but I'm not sure how the Japanese may want to see a Japanese Flag on a tourist's nails!  *hehehe*  Cherry Blossoms is the best bet but I've done Cherry Blossom inspired nails quite a number of times!  (Check HERE and HERE).

Since I'm wishing for luck this year not only for me but also for my family and friends, I thought of creating the famous "Maneki Neko" cat which is also known as the "Beckoning Cat", "Welcoming Cat", "Lucky Cat", "Fortune Cat", "Money Cat" or just plain....(in my dictionary) "Super Cute Cat"!

I researched on cute photos and prayed that I will give justice to the cute face of Neko!  


Since this is a freehand design, I've decided to create a simpler version!  Here's the result...

 (Not as cute as the photo above but they do look like smiling cat! hehehe)

 a photo of Maneki Neko Nail art

Thursday, August 4, 2011

AMW Reviews: The Face Shop Lovely ME:EX Nail Polish remover

I ran out of all my favorite nail polish removers which I bought in Korea.  I am not complaining, it was 9months worth of nail polish remover supply!  

Because I've been so happy with the performance on ALL Korean Branded polish remover, I've decided to continue using one and this one's from The Face Shop as I haven't been back to any Etude House or even Tony Moly stores at the moment! 

They use to have this in pink and blue variant, can't seem to find the blue one!  The company probably decided to just sell one and PINK is the winner I guess in terms of sales!

The Face Shop Lovely ME:EX Nail Polish Remover says ---

AMW says ---
Pros
  • It's packaging is actually effective enough for the nail polish remover not to evaporate when not in use.
  • Removes regular polish quite easily.
  • Smells great, it does not irritate my nose.
  • Inexpensive, a little is enough.  One cotton pad can clean at least 3-4 nails (considering I have nail art)
  • Available locally, you can easily find The Face Shop stores inside malls.
  • Does not dry out my nails or cuticle.
  • No white 'film' visible as compared to drying nail polish removers.
Cons
  • Not really a con but I prefer to have these in bigger size so I can refill it to this small packaging.  It saves the environment as well!
Overall
A wonderful alternative to expensive brands!  The Face Shop Lovely ME:Ex Nail Polish remover works and its not so pricey!  The cheaper ones can really dry out my nails and cuticles!

Tips
  • Use cotton pad instead of cotton balls.
  • For glitters or polish that are quite dark and hard to remove, leave the cotton pad on top of your nails for at least 30seconds before you gently massage to effectively remove the polish.
  • Always make sure to close the cap tight.  
  • You can transfer the polish into an Acetone  Pump which is mess free and leak proof!
  • Store in cool, dry place.
  • Even if this polish remover smells good, try not to inhale much of this scent as its still chemical.
  • After removing polish, I prefer to gently wipe my nails with damp cloth to remove excess chemical left on nails.  I am not washing my hands as it may create bubble once you apply polish.
Will I repurchase?
Yes! I just did!

To whom do I recommend this to?
Nail Polish lovers out there who wants to try different shades of polish!  A gentle kind of nail polish remover also helps your nails by not stripping its layer.

Where to purchase and how much?
At The Face Shop stores for Php95.00 (approx $2.00).

Most of the nail polish removers in Korea costs around Php80.00 (less than $2.00), yes, its more inexpensive but there's no point going to Korea and pay for expensive plane fare just for these.  I think the local rate is priced quite reasonably!  This is my to-go polish remover for now while I am still in search for "bigger packaged" polish removers!

Anyone tried Tony Moly, Etude House's and This one?
Which one is better for you?
I've tried Tony Moly's and I think they work just the same!

Oh, I'm still in Shanghai and trying "hard" to sleep.  I'm not used to sleeping in a hard bed!  *laughs*  I know its good for my posture but I'm too old for "posture correction"!  hahaha  Internet connection is still SUPER bad but thank goodness for drafts and all I need to do is type in the words even without photos showing up here!

Another update....why does China have to be THIS BIG???  My legs are in pain from all the walking! :)  I'm staying positive, I'm going back home with SEXY LEGS *winks*

Miss you all!
Keep smilin'
Stay happy!


Thursday, May 12, 2011

AMW Version: "Work and Play"

(Note from author: All previous comments were gone due to Blogger issues)
Some of the AMW readers asked me what's the right look to sport that they can wear during the office that would still look perfect after office!  I understand how difficult it is to go to your office lugging your whole make-up kit or probably have your make-up done at home but really?  A party make-up inside the office? 

I've created a wearable look that's effective for "Work and Play" with the help of my new Revlon Colorstay 12 Hour Eye Shadow compact

How I wish I could brag about my "full lashes" ---> not real! :P


AMW Diagram

Prior to eyeshadow application, I primed my lids with Etude House Proof 10 Eye Primer.  Using The Body Shop Kajal Eye Liner in 02 Evergreen, I applied this all over the crease going beyond.  I don't mind if its not drawn perfectly, this only serves as a base for my light colored shadow.


Step 1:
Apply the Green shadow on top of the TBS Kajal Eyeliner Evergreen base.  The pigmentation of the Revlon Colorstay Quad is not that dark, so a good base is important to make the color pop.


Step 2:
I used the same brush to apply the purple shade on the outer corner of my eyes creating a "fake" deep set eyes.  Same quad was used. 
With a smaller pencil brush, apply the same shade on the lower lash line.


Step 3:
With the eye shadow applicator, applied the pearl white shade on the brow bone area to highlight the area.  This trick helps create a bigger eyes.


Step 4:
Used E.L.F. Cream Eyeliner in Black for eyelining with my favorite Ecotools brush.


Fill in my brows with the recently reviewed 

Since this look needs to fit for after office "play", I chose to use falsies.  In this tutorial, I've used Eye's Chic Eyelashes no. 815 from KKCenterHK.

Note from AMW: I am loving the lashes from KKCenterHK because no matter how thick or long my lashes look, they remain to feel so natural and light!  I've used a lot of the lashes from the said company to my clients who are first-time falsies user and they told me that they feel surprisingly comfortable with it! 


My eyes are ready to work and play!


Now the rest of my face should also get ready!


For the face
CK Infinite Matte Oil-Free Foundation in Porcelain
Lunasol Micro Finish Powder to set


For the Cheeks
E.L.F. Contouring Blush and Bronzing Powder

For the Lips
Revlon Colorburst Gloss in 004 Pink Ice Glace Rose


You can change your lip color into something brighter when you're off from work!  The nude lips work perfectly to counteract the dark eyes (dark in person).  At the end of the day, your eyeshadow may fade a bit so bright lips is going to rock the party world! :)


What's your Work and Play look?
Share to us for more inspiration!


Keep smilin'
Stay happy!